When multiple workers service a single machine, confusion over isolation points can lead to accidental re-energization. That’s where the lockout tagout group lock box procedure becomes essential. It’s not just about attaching locks—it’s about orchestrating safety across teams while maintaining control, clarity, and compliance.
This procedure ensures that every technician on a job maintains personal accountability while working under a coordinated energy control plan. Missteps can result in catastrophic outcomes, but a well-executed group lockout process eliminates ambiguity and reduces human error.
Here’s how to implement it effectively.
Why Standard Lockout Isn’t Enough for Multiple Workers
A single-person lockout is straightforward: one employee applies their lock, performs maintenance, and removes it upon completion. But when three, five, or ten technicians work on different parts of the same equipment—each needing protection from unexpected startup—individual lockout points become impractical.
Imagine a conveyor system being serviced by an electrician, two mechanical fitters, and a hydraulics specialist. Each has a unique task, but all depend on the same main power disconnect. If they each lock the same point, it creates crowding, increases risk of lost keys, and complicates verification.
The solution? A centralized group lock box system.
What Is a Lockout Tagout Group Lock Box?
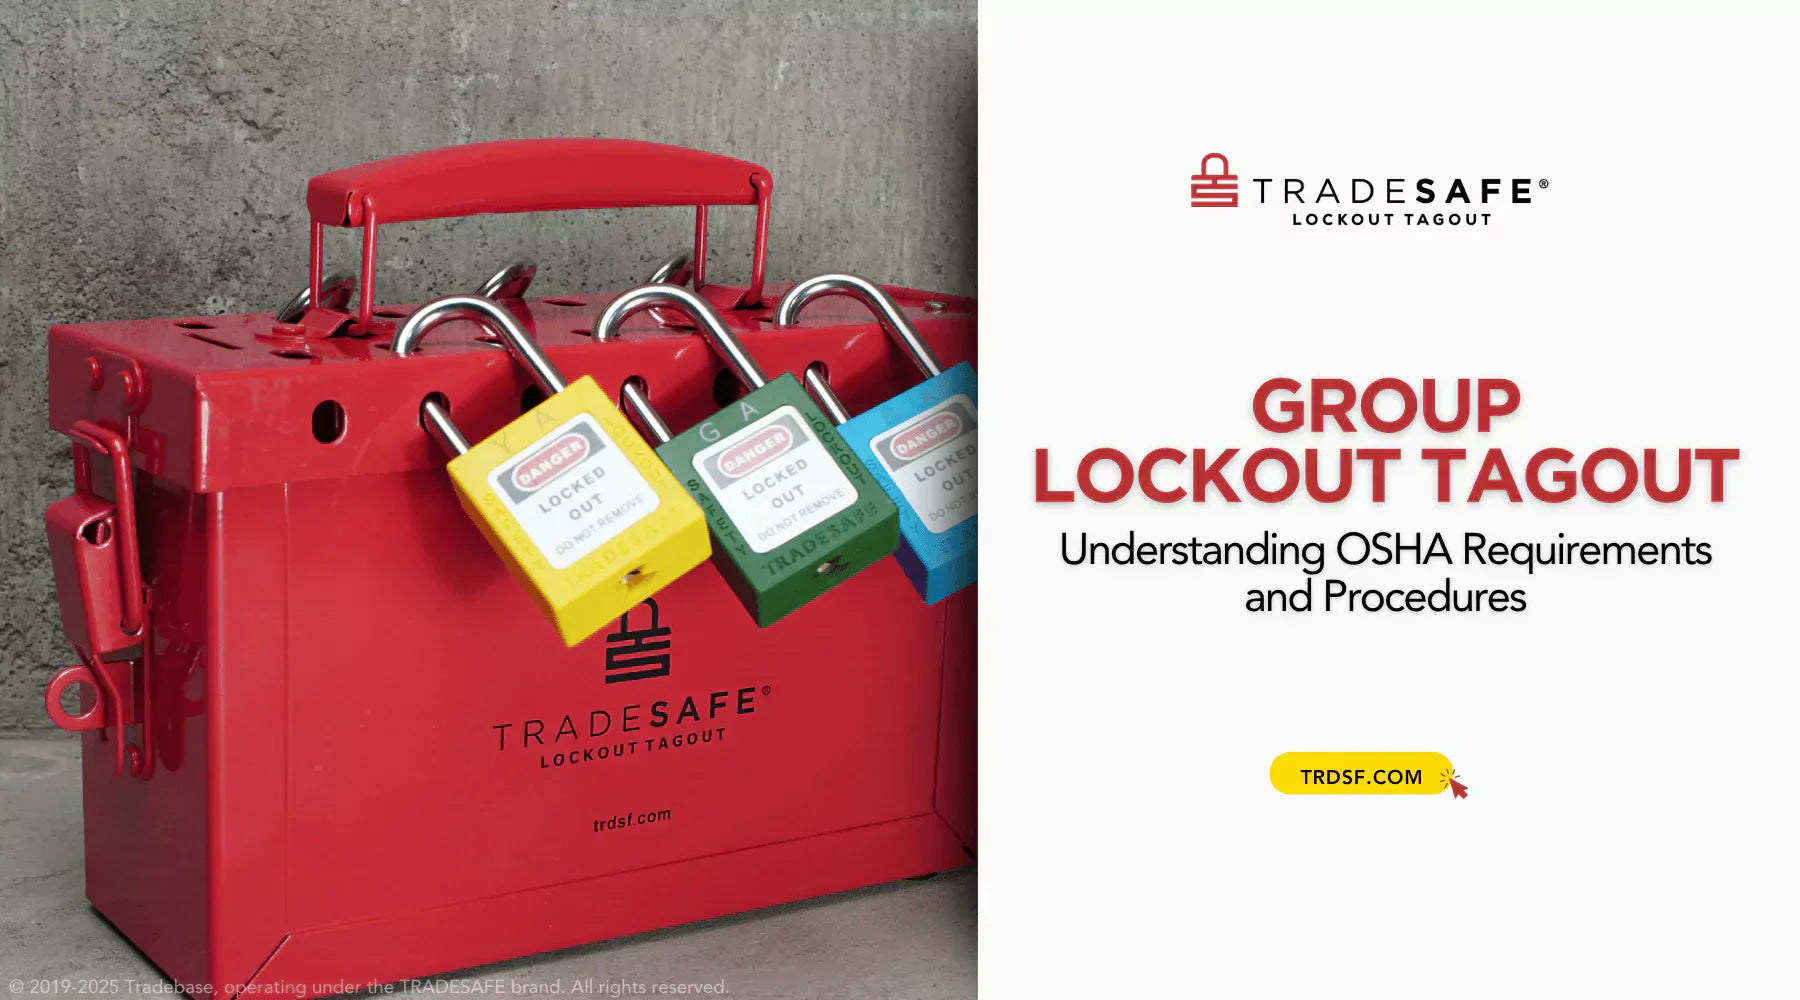
A group lock box (also called a lockout station or hasp box) is a secure container that holds individual locks and tags during multi-person maintenance operations. It acts as a physical hub where isolation points are controlled collectively, yet accountability remains individual.
Here’s how it works: - The machine is de-energized at its primary source. - A designated lead authorized employee initiates the lockout and places the primary lock on the energy isolating device. - That lead then transfers the key to their personal lock into the group lock box. - Each additional worker places their personal lock on the box—never on the machine itself. - Only when all personnel have locked out can the work begin. - At completion, each worker removes only their own lock. The last person verifies the area is clear and removes the primary lock from the energy source.
This method maintains OSHA compliance while allowing flexibility for staggered shifts or breakout teams.
Step-by-Step Group Lock Box Procedure
Follow this structured sequence to ensure safety and compliance:
#### 1. Designate a Lead Authorized Employee One qualified person oversees the entire process. This individual: - Verifies shutdown and isolation - Applies the first lock - Manages communication among team members - Confirms zero energy state before work begins
Without clear leadership, coordination breaks down.
#### 2. Shut Down Equipment Properly Use established operating procedures to stop the machine. Notify all affected staff. Avoid emergency stops unless necessary—they don’t qualify as isolation methods.
#### 3. Isolate All Energy Sources Identify and disconnect every potential energy source: electrical, pneumatic, hydraulic, thermal, gravitational, and chemical. Use disconnect switches, block valves, bleed lines, and mechanical restraints.
For example, a press line may require electrical isolation, air line bleeds, and flywheel braking. Each must be individually verified.
#### 4. Apply the Primary Lock and Transfer Key The lead locks the main disconnect with their personal lock. The key to this lock goes into the group lock box. The box remains unlocked at this stage to allow others to contribute.
#### 5. Team Members Add Their Locks Each technician places their personal lock onto the group box. No one begins work until every relevant worker has locked in.
Important: Never allow a coworker to place your lock. Personal accountability is non-negotiable under OSHA 1910.147.
#### 6. Verify Zero Energy State The lead rechecks all points using test instruments or other validation methods. Only after confirmation does work commence.
#### 7. Begin Maintenance Tasks Workers proceed with their assigned duties. If someone finishes early, they leave their lock in place until all work is complete.
#### 8. Clear the Area and Remove Locks Once all tasks are done: - Each worker confirms their part is finished and tools are removed - Each removes only their own lock from the group box - The last person checks the entire zone for personnel, tools, and obstructions - The lead retrieves the key from the now-unlocked box and removes the primary lock from the energy source
Real-World Example: Overhaul of a Packaging Line
A food processing plant schedules a full weekend overhaul of its primary packaging line. Five technicians are involved: two electricians, two mechanics, and a controls engineer.
The lead electrician: - Shuts down the line via the main disconnect - Locks the panel with his personal padlock - Places the key in the group lock box mounted nearby - Waits as others arrive and apply their locks to the box
One mechanic needs to replace a drive belt and delays arrival by 30 minutes. Until his lock is added, no work starts—even though others are ready.
Later, one electrician finishes programming the HMI early. He cannot remove his lock until everyone else is done. His lock stays on the box as a physical reminder that someone was involved in the lockout.
When the final worker removes their lock, the lead retrieves the key, confirms the line is clear, and safely re-energizes the system.
No overrides. No exceptions. Full traceability.
Common Mistakes That Break the System
Even experienced teams make errors that compromise safety:
- Using a master key: Defeats the purpose of personal control. If one person can unlock everyone, accountability disappears.
- Sharing locks or keys: Violates OSHA rules and increases risk of miscommunication.
- Leaving the box unattended and unlocked: Invites unauthorized access or tampering.
- Skipping verification steps: Assuming isolation is complete without testing leads to false confidence.
- Allowing “buddy locking”: One worker applying another’s lock undermines the entire procedure.
One manufacturing site reported a near-miss when a supervisor used a spare key to unlock a box because a technician was running late. The machine powered on mid-maintenance. Fortunately, no one was in the danger zone—but the violation triggered a full safety audit.
Personal locks must stay under personal control at all times.
Equipment Needed for Effective Implementation
You don’t need high-tech solutions, but the right tools make execution smoother and more reliable:

| Item | Purpose | Best Practice |
|---|---|---|
| Group lock box (6–12 lock capacity) | Centralized lock storage | Mount near work area, label clearly |
| Personal padlocks (color-coded) | Individual accountability | One lock per person, uniquely keyed |
| Hasps or lockout brackets | Enable multiple locks on single point | Use only on approved isolation devices |
| Tags with employee info | Identify who locked out | Include name, department, time, reason |
| Key-in-key interlocks (optional) | Control sequence of operations | Useful for complex systems with multiple zones |
Some facilities use electronic lockout systems with RFID keys and digital logging. While advanced, they require training and backup procedures during outages.
For most environments, a robust mechanical system is sufficient—and often more reliable.
When the Procedure Fails: Limitations and Workarounds
The group lock box system assumes all workers are present at both start and finish. But what happens when:
- A worker doesn’t show up after shift change?
- Someone leaves early due to illness?
- A contractor finishes and departs before others?
In such cases, strict protocols must govern lock removal: - A documented handover process allows transfer of responsibility - Supervisors may remove a lock only after verifying the worker is clear and the equipment is safe - Removal requires inspection, notification, and written authorization
OSHA permits lock removal under “alternative means” if: - The employee cannot be contacted - A safe procedure exists to verify absence and safety - The employer follows established protocol
Never cut a lock off without authorization. Always document the reason.
Training and Compliance: Making It Stick
Having a procedure on paper isn’t enough. Workers must understand why it matters.
Effective training includes: - Hands-on drills with real equipment - Simulated breakdowns and lockout scenarios - Role-playing staggered arrivals and departures - Regular audits of completed procedures
One refinery conducts quarterly “surprise lockout audits.” A safety officer arrives unannounced during maintenance and checks: - Were all workers listed in the log? - Are locks properly applied? - Is the group box used correctly?
Results are shared anonymously, with recognition for compliant teams. Over two years, this reduced procedural deviations by 78%.
Culture drives compliance—not just policy.
The lockout tagout group lock box procedure isn’t bureaucratic overhead—it’s a lifeline. When executed with precision, it transforms chaotic maintenance into a synchronized, safe operation. Whether you’re servicing a single pump or a full production line, the principles remain the same: personal accountability, centralized control, and unwavering verification.
Start by reviewing your current process. Identify gaps. Train your leads. Equip your teams. Then run a live drill—because the first time you do it right shouldn’t be during an emergency.
Safety isn’t a checklist. It’s a practice.
FAQ
What is the purpose of a group lockout box? It allows multiple workers to lock out a single machine safely by centralizing control while maintaining individual accountability.
Who places the first lock in a group lockout? The lead authorized employee applies the primary lock to the energy source and places the key in the group box.
Can a supervisor remove someone else’s lock? Only under strict procedures involving verification, notification, and documentation—never casually or without authorization.
Do all workers need to be present to start work? Yes. No one begins until every involved technician has applied their lock to the group box.
What type of lock should be used? Each worker must use a personal, uniquely keyed padlock—never shared or duplicated.
Where should the group lock box be installed? Near the work area, clearly labeled, and accessible only to authorized personnel during maintenance.
Is a tag required with each lock? Yes. Each lock must be accompanied by a tag identifying the worker, time, and reason for lockout.
FAQ
What should you look for in Lockout Tagout Group Lock Box Procedure Explained? Focus on relevance, practical value, and how well the solution matches real user intent.
Is Lockout Tagout Group Lock Box Procedure Explained suitable for beginners? That depends on the workflow, but a clear step-by-step approach usually makes it easier to start.
How do you compare options around Lockout Tagout Group Lock Box Procedure Explained? Compare features, trust signals, limitations, pricing, and ease of implementation.
What mistakes should you avoid? Avoid generic choices, weak validation, and decisions based only on marketing claims.
What is the next best step? Shortlist the most relevant options, validate them quickly, and refine from real-world results.